

Why Installing a Basement Sump Pump Protects Your Home
If you want to install basement sump pump in your home, you're taking a smart step toward protecting your property from water damage. Just one inch of basement water can cause thousands of dollars in damage, but a properly installed sump pump efficiently collects and redirects groundwater away from your foundation before it becomes a problem. Whether you're dealing with occasional dampness or preparing for seasonal flooding, understanding the installation process helps you decide between tackling this advanced DIY project or calling in professional help.
Quick Answer: Basic Sump Pump Installation Steps
- Choose the lowest spot in your basement, at least 10 inches from foundation walls
- Dig a sump pit 6-10 inches deeper and wider than your basin (typically 18-24 inches deep)
- Install the basin on a gravel base, ensuring it's flush with the floor
- Connect the pump to a discharge pipe with check valve and gate valve
- Route the pipe outside at least 10 feet from your foundation
- Test the system by filling the pit with water to verify automatic operation
- Seal and finish with concrete around the basin
For expert plumbing installation and maintenance services, visit our plumbing services page, or if you need immediate professional help with your sump pump project, contact Sureway Comfort today.
This guide walks you through everything you need to know about installing a sump pump in your basement, from choosing the right equipment to testing your finished system. Most DIY installations take a couple of weekends and require advanced skills, especially when working with concrete and electrical systems. A professional installation typically takes 2 to 4 hours, depending on complexity, and ensures your system meets local building codes while protecting your basement for years to come.

Pre-Installation: Planning, Tools, and Safety
Before you begin the exciting journey of installing a basement sump pump, careful planning is paramount. This isn't a project to rush into; it requires a thorough home assessment and a strong emphasis on safety. We want you to be prepared, confident, and most importantly, safe throughout the entire process.
Understanding Sump Pumps and Why You Need One
A sump pump is a specialized appliance designed to protect your home from water damage by collecting and redirecting groundwater away from your foundation. It typically sits in a purpose-built pit, often in the lowest spot of your basement. When water levels rise, a float switch automatically activates the pump, which then pushes the water safely outside your home. It's a simple yet incredibly effective defense against the headache and expense of a flooded basement.
Why do homes in areas like Bridgeville, Canonsburg, and Bethel Park often need sump pumps?
- Signs of water issues: You might notice damp spots, standing water, or a persistent musty odor in your basement. Water stains on walls or floors, or even visible mold growth, are clear indicators that water is finding its way in.
- High water tables: If your home is in a low-lying area or an area with a naturally high water table, groundwater can easily seep into your basement, especially after heavy rains or snowmelt.
- Foundation protection: Constant moisture can compromise the load-bearing capability of wood and warp it, and even durable materials like concrete and brick can be negatively affected by constant moisture. A sump pump helps keep your foundation dry, preventing costly structural damage.
- History of flooding or poor drainage: If your home has experienced flooding in the past, or if external factors like improper grading or clogged gutters direct water towards your foundation, a sump pump provides crucial protection.
Even if your basement seems dry now, a sump pump acts as a proactive measure, saving you from potential future disaster. Just one inch of basement water can cause thousands in damage!
Choosing the Right Pump, Tools, and Location
Selecting the right sump pump is crucial for effective water management. There are a few main types, each with its own advantages:
- Submersible Pumps: These pumps sit directly in the sump basin, submerged in water. They are generally quieter, more efficient, and often considered the most robust and reliable option, with some capable of working for decades. They are a better choice for finished basements due to their quiet operation.
- Pedestal Pumps: With these, the motor is mounted above the sump pit, making them easier to access for maintenance and repair. They are typically less expensive but can be noisier.
- Battery-Operated Backup Pumps: Highly recommended for areas prone to power outages, these systems kick in automatically if your primary pump loses power.
- Water-Powered Backup Pumps: These use your home's water pressure to operate, offering another reliable backup option that doesn't rely on electricity.
For moderately wet areas, a 1/2-horsepower sump pump is often sufficient, while a 3/4-hp model is recommended for spots with heavy flooding.
Our team at Sureway Comfort recommends considering the full system, including the sump pit and discharge lines, when deciding on your pump.
Tools and Materials You'll Need:To install basement sump pump, you'll need a range of tools and materials. Here’s a comprehensive list:
- Sump Pump Kit: Includes the pump and basin (often 18-inch diameter by 24-inch deep).
- Discharge Piping: 1-1/2" or 2" PVC pipe, elbows, and connectors.
- Check Valve: Essential to prevent backflow.
- Gate Valve (optional but recommended): For manual shut-off.
- Gravel: 3/4-inch to 1/2-inch for the sump pit base and filling around the basin.
- Quick-Set Concrete: For sealing around the basin.
- PVC Cement and Primer: For secure pipe connections.
- Sealant Caulk/Spray Foam: For sealing exterior pipe penetrations.
- Jackhammer/Demolition Hammer: For breaking concrete.
- Shovel and Trowel: For digging and concrete work.
- Measuring Tape and Marking Tools: For precise measurements.
- Level: To ensure the basin is flush.
- Safety Gear: Eye protection, hearing protection, dust mask, gloves.
- Wet/Dry Vacuum: For cleaning the pit.
- Dedicated GFCI Electrical Outlet: Crucial for safety and proper operation.
- Drill with Masonry Bits: For drilling holes in concrete or walls.
Choosing the Right Location:The location of your sump pump is critical. We look for the lowest point in your basement, as this is where water naturally collects. It should also be:
- At least 10 inches from foundation walls: This helps avoid disturbing the structural integrity of your home's footings.
- Near a dedicated GFCI electrical outlet: Sump pumps require a reliable power source, and a GFCI outlet provides essential shock protection. Never use an extension cord with a sump pump.
- Close to an exterior wall: This simplifies the routing of the discharge pipe, minimizing the length and complexity of the external drainage. Consider the best place to discharge the water outside your home, ensuring it slopes away from the foundation.
Consider these factors carefully before you begin. If you're unsure, our experienced technicians in areas like Mt. Lebanon and Upper St. Clair can help you identify the optimal placement.
Your Step-by-Step Guide to Install Basement Sump Pump
Ready to roll up your sleeves and install basement sump pump? This guide breaks down the process into manageable steps. That this is an advanced DIY project, especially given the concrete work and electrical connections. While a professional installation typically takes 2 to 4 hours, doing it yourself can easily stretch over a couple of weekends. Always adhere to local building codes, and if in doubt, consult with a licensed professional.
Step 1: Create the Sump Pit
The sump pit is the heart of your sump pump system. It's where water collects before being pumped away.
- Mark the Location: Once you’ve chosen the ideal spot, place your sump basin on the floor. Trace a circle around it. For digging, you'll want to mark a larger circle or oval, about 4 to 6 inches outside the basin's perimeter, to give you working room. Ensure this spot is no closer than 14 inches from any basement walls to avoid disturbing footings.
- Break Through the Concrete: This is often the most physically demanding part. Using a jackhammer or demolition hammer with a flat spade bit, carefully break up the concrete slab within your marked area. Wear appropriate safety gear, including eye and hearing protection and a dust mask. Be mindful of any utility lines buried beneath the slab.
- Dig the Hole: Once the concrete is removed, dig out the soil beneath. The goal is to create a hole large and deep enough to accommodate your sump basin, with an additional 5 to 6 inches of space at the bottom for a gravel base and some room around the sides. A typical sump pit depth is around 24 to 30 inches from the top of the concrete floor.
- Create a Gravel Base: Line the bottom of the excavated hole with about 5 to 6 inches of 1/2-inch to 3/4-inch gravel. This gravel base helps with drainage and provides a stable, level surface for your sump basin. This bed of rock helps level the basin and adds proper drainage.
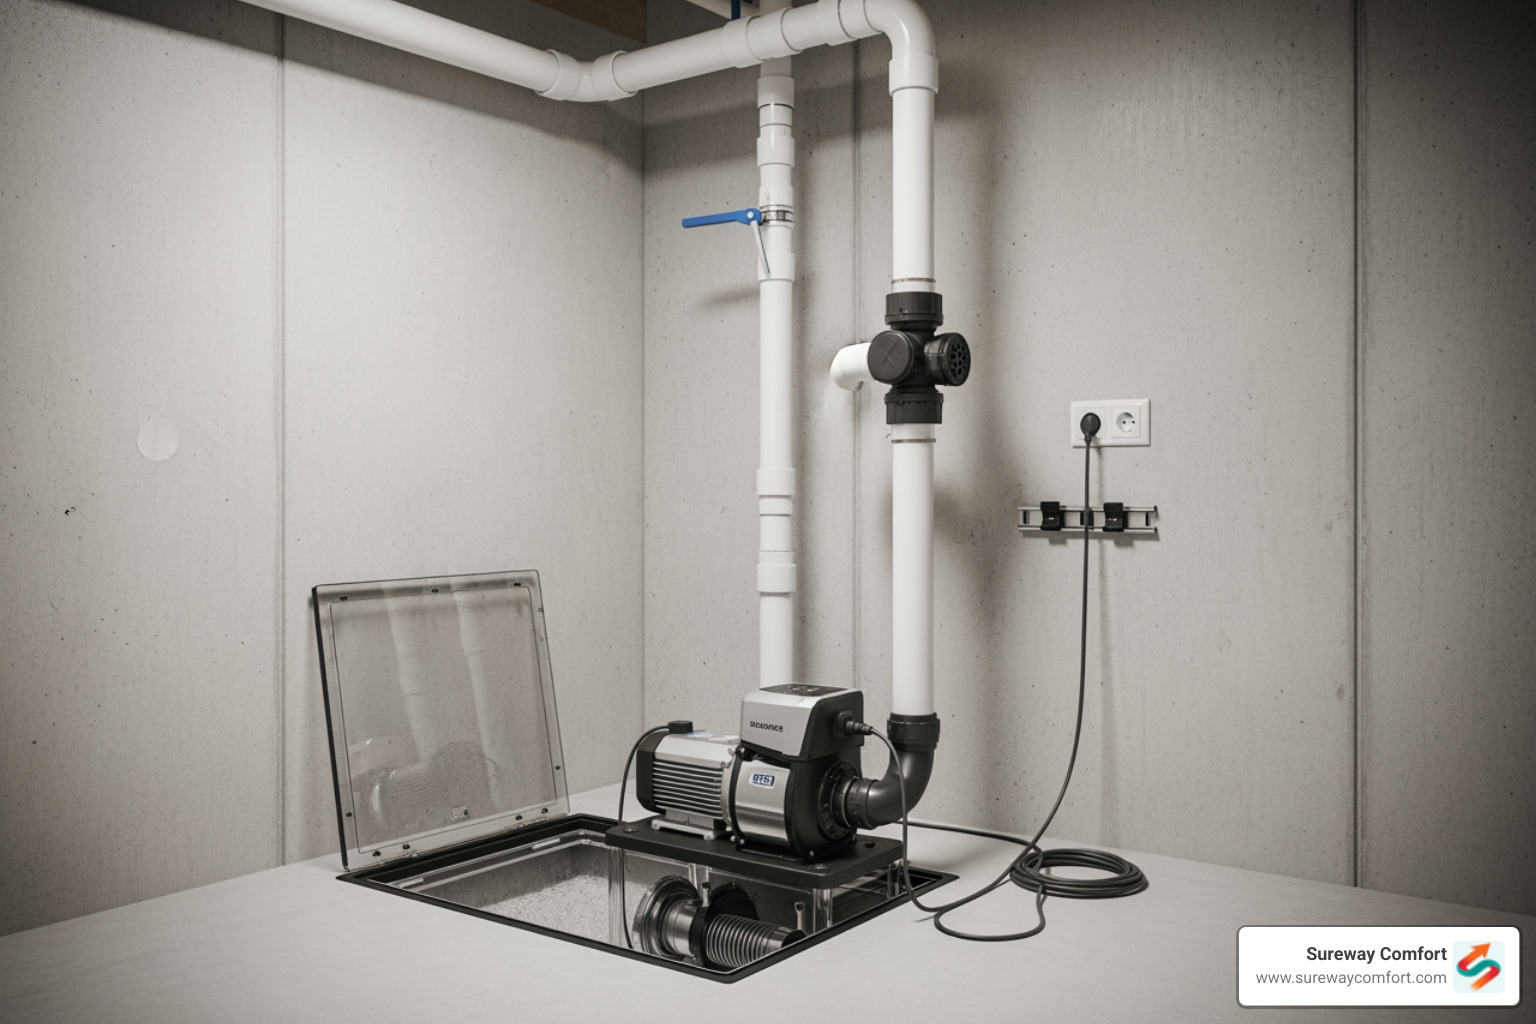
Step 2: Install the Pump and Discharge Assembly
With the pit ready, it's time to assemble the core components.
- Place the Sump Basin: Carefully lower the sump basin into the pit. Use your level to ensure the top of the basin is flush with or slightly above the surrounding concrete floor. Add or remove gravel beneath the basin as needed to achieve a perfectly level placement.
- Set the Sump Pump: Place your chosen sump pump inside the basin. For submersible pumps, ensure it sits flat on the bottom (you can place a concrete paver on the gravel base for added stability if needed). If you're installing a battery-operated backup pump, position its float switch several inches higher than the main pump's, so it only activates if the primary pump fails.
- Connect the Discharge Pipe: This is where the water exits the pump. Screw a 1-1/2" or 2" check valve directly into the sump pump's discharge port. This valve is critical because it prevents water that has been pumped out from flowing back into the pit when the pump cycles off. Without it, your pump would work overtime and wear out quickly.
- Plumb the PVC Pipe: Using PVC cement and primer for secure connections, begin plumbing your 1-1/2" or 2" PVC discharge pipe into the top of the check valve. Extend the pipe vertically, using elbows and short lengths of pipe to direct it towards the exterior wall where you plan to discharge the water. If desired, install a gate valve in the vertical pipe section for manual shut-off during maintenance.
- Secure the Basin Lid: Fasten the basin lid, threading the discharge pipe and the pump's power cord through the appropriate holes. An airtight, gasketed lid is recommended, especially if radon or other soil gases are a concern, as it helps prevent these gases from entering your home.
Step 3: Route the Discharge Pipe and Finalize the Pit
The final installation steps involve getting the water out and finishing the concrete work.
- Route Through the Wall: You'll need to bore a hole through your exterior wall, typically through the rim joist and siding, for the discharge pipe to pass through. This hole should be large enough to accommodate the pipe and should ideally be one to two inches above ground level. If you have a backup pump, you'll need a separate hole for its discharge line.
- Exterior Pipe Routing: Connect the interior PVC pipe to the exterior portion. Attach a 90-degree elbow to direct the line through the exterior wall. Extend the discharge pipe outside, ensuring it's routed at least 10 feet away from your home's foundation. This prevents the pumped water from simply cycling back into your basement. The pipe should ideally extend about 6 inches from the home and be about 24 inches above ground to prevent freezing and water pooling.
- Seal the Penetration: Seal around the discharge pipe where it exits the home using sealant caulk or spray foam. This prevents water, pests, and air drafts from entering your home.
- Concrete Patching: Mix quick-set concrete and pour it into the space between the sump basin and the excavated hole in the floor. Trowel it flush with your existing basement floor, creating a smooth, continuous surface.
- Curing Time: Allow the concrete to cure for at least 24 hours before putting any weight on it or proceeding with other basement activities.
Congratulations! You've completed the physical installation of your basement sump pump. Now, let's make sure it's working perfectly and stays that way.
After Installation: Testing, Maintenance, and Professional Help
You've done the hard work to install basement sump pump, and honestly, that's something to be proud of! But here's the thing: your job isn't quite finished yet. Think of your new sump pump like a car—it needs regular check-ups to run smoothly. Proper testing right after installation and ongoing maintenance are what separate a reliable system from one that might let you down when you need it most.
How to Test and Maintain Your Install Basement Sump Pump
Let's start with the moment of truth: making sure your pump actually works. After everything is connected and the concrete has cured, plug in your sump pump and grab a bucket. Pour several gallons of water into the sump pit—enough to trigger the float switch. Watch carefully as the pump should kick on automatically, drain the water quickly, and then shut itself off when the water level drops. If the float switch moves freely without getting stuck on anything, you're in great shape.
This initial water test gives you confidence that your system is ready for action. But don't stop there.
Regular cleaning is where most homeowners can extend their pump's life significantly. Every few months, take a look inside your sump pit. You'll probably find gravel, sand, or silt that's accumulated over time. This debris can clog your pump's intake screen and reduce efficiency. Before you do any cleaning, always unplug the pump from its power source—safety first! Use a garden hose to spray off loose residue, a scraping tool for anything stubborn, and a wet/dry vacuum to clear out the pit itself.
While you're at it, inspect your check valve for any signs of leaks or blockages. This little component does the crucial job of preventing water from flowing back into your pit after the pump shuts off. Without a working check valve, your pump runs constantly and wears out fast.
Don't forget about the power supply either. Take a minute to check the cord and plug for wear or damage, and make sure your dedicated GFCI outlet is still functioning properly. These small checks prevent big problems down the road.
Here's some good news: most sump pumps last 7 to 10 years with regular maintenance. Submersible pumps, which are known for their durability, can sometimes work for decades if you treat them right. That's a pretty solid return on your investment! Resources from FEMA and the U.S. Department of Energy offer additional guidance on keeping your system in top shape.
When to Call a Professional for Your Install Basement Sump Pump
Now, we've walked you through a complete DIY installation, but let's be real: sometimes calling in the pros is the smarter choice. There's no shame in recognizing when a project is beyond your comfort zone or available time.
Complex electrical work is a big one. If your chosen location doesn't have a dedicated GFCI outlet nearby, you'll need proper wiring installed. Unless you're a licensed electrician, this isn't something to tackle yourself. Electrical mistakes can be dangerous and expensive.
Maybe you're considering integrating a French drain system around your home's perimeter. This setup is incredibly effective because it collects water from all sides of your foundation and funnels it directly to your sump pit. But installing a perimeter drain system is a major undertaking that requires excavating around your entire foundation. That's where professional expertise really pays off.
Finished basements present their own challenges. You'll need to carefully remove floor coverings, cut through flooring materials, and then restore everything to look seamless after the installation. It's definitely possible, but it requires a delicate touch and experience working around existing structures in areas like Carnegie and Green Tree.
If you don't own a jackhammer or specialized tools, or if you're relatively new to projects involving concrete and plumbing, the learning curve can be steep. Our team at Sureway Comfort has invested in all the right equipment and has years of experience with these installations across Bridgeville, Canonsburg, and surrounding communities.
Then there's the time factor. A DIY installation typically stretches over a couple of weekends, while a professional can complete the job in a single day—often just 2 to 4 hours depending on complexity. If you need your basement protected quickly, or if you simply don't have multiple weekends to dedicate to the project, professional installation makes practical sense.
Finally, local building codes often have specific requirements for sump pump installation, discharge routing, and electrical connections. Our technicians stay current with these regulations and ensure your installation meets all necessary standards. This prevents headaches with inspections and gives you confidence that everything is done right.
If any of these situations sound familiar, don't hesitate to reach out to Sureway Comfort. Our experienced team serves homeowners throughout Scott Township, Brookline, Mt. Lebanon, Upper St. Clair, and Bethel Park. We're here to help with reliable plumbing services whenever you need us.
Frequently Asked Questions
Can a sump pump be installed in a finished basement?
Yes, absolutely! We can install basement sump pump systems in finished basements. The process requires carefully removing floor coverings around the installation area and then replacing them after the work is complete. That while a sump pump keeps water out of your basement, it doesn't address the source of water problems. You might also need exterior grading improvements or better gutter systems to fully protect your space.
Are battery backup systems necessary?
We highly recommend battery backup systems, especially here in Pennsylvania where storms and power outages happen. Your sump pump needs electricity to run, so if the power goes out during a heavy rain—exactly when you need the pump most—your basement is vulnerable without backup. A battery system keeps everything running, giving you true peace of mind. Water-powered backup pumps are another option that uses your home's water pressure instead of electricity.
Why is an airtight lid important for a sump pit?
An airtight, gasketed sump pit cover does more than just keep things tidy. It prevents soil gases like radon, water vapor, and methane from entering your home. This is particularly important for radon mitigation, as emphasized by the EPA's Radon Mitigation Standards. Look for covers that seal tightly while still allowing you to observe conditions inside the pit.
How far away from the house should the discharge pipe extend?
Your discharge pipe should extend at least 10 feet away from your home's foundation. This distance ensures that pumped water doesn't immediately seep back into the ground around your foundation, creating a frustrating cycle. The further away and downhill you can route it, the better your system will perform.
Conclusion
Well done! You've steerd the ins and outs of how to install basement sump pump and protect your cherished home from the unwelcome surprise of water damage. It's truly one of the smartest investments you can make for your property, ensuring a dry, healthy, and secure living space for years to come.
Whether you've rolled up your sleeves and tackled this advanced DIY project yourself – kudos to you for taking on such a significant task! – or you're now feeling confident about bringing in the experts, understanding this process is key. A working sump pump isn't just a gadget; it's your home's silent guardian, preventing expensive water damage, stopping mold in its tracks, and keeping your foundation strong. That's a whole lot of peace of mind right there.
While there's immense satisfaction in a successful do-it-yourself project, we understand that complex tasks like concrete work, electrical connections, or simply a busy schedule might make professional assistance a more appealing and efficient choice. It's all about making the best decision for your home and your family's comfort and safety.
That's where we come in. At Sureway Comfort, we’re passionate about making your home safe and comfortable. Our team of experienced technicians follows streamlined processes to ensure top-notch service, whether you're in Bridgeville, McDonald, Mt Lebanon, Bethel Park, Canonsburg, Collier, South Fayette, Upper St. Clair, Carnegie, Green Tree, Scott Township, Brookline, or Oakdale.
For reliable plumbing services, including expert sump pump installation and maintenance, don't hesitate to reach out. We're here to help you keep your basement dry and your worries at bay, come rain or shine! Contact us for professional plumbing services today.


.avif)


